Privacy Policy

Friday, 29 August 2014

Time to get Organised!

Hi Folks.

Right, time to get myself organised. My new academic year resolution is to blog every week and I'm in the process of writing blog posts for the next few weeks to get ahead! The last couple of months have been soooo busy with Christmas design team makes, Vintage Christmas, Create a Card Dies, and Classique Christmas Dies from Crafters Companion.

Today I'm sharing some of my Create a Card Christmas Samples. I love working with these dies. It's so easy to make quick and simple cards that look fantastic but you can really take your projects to the next level too.

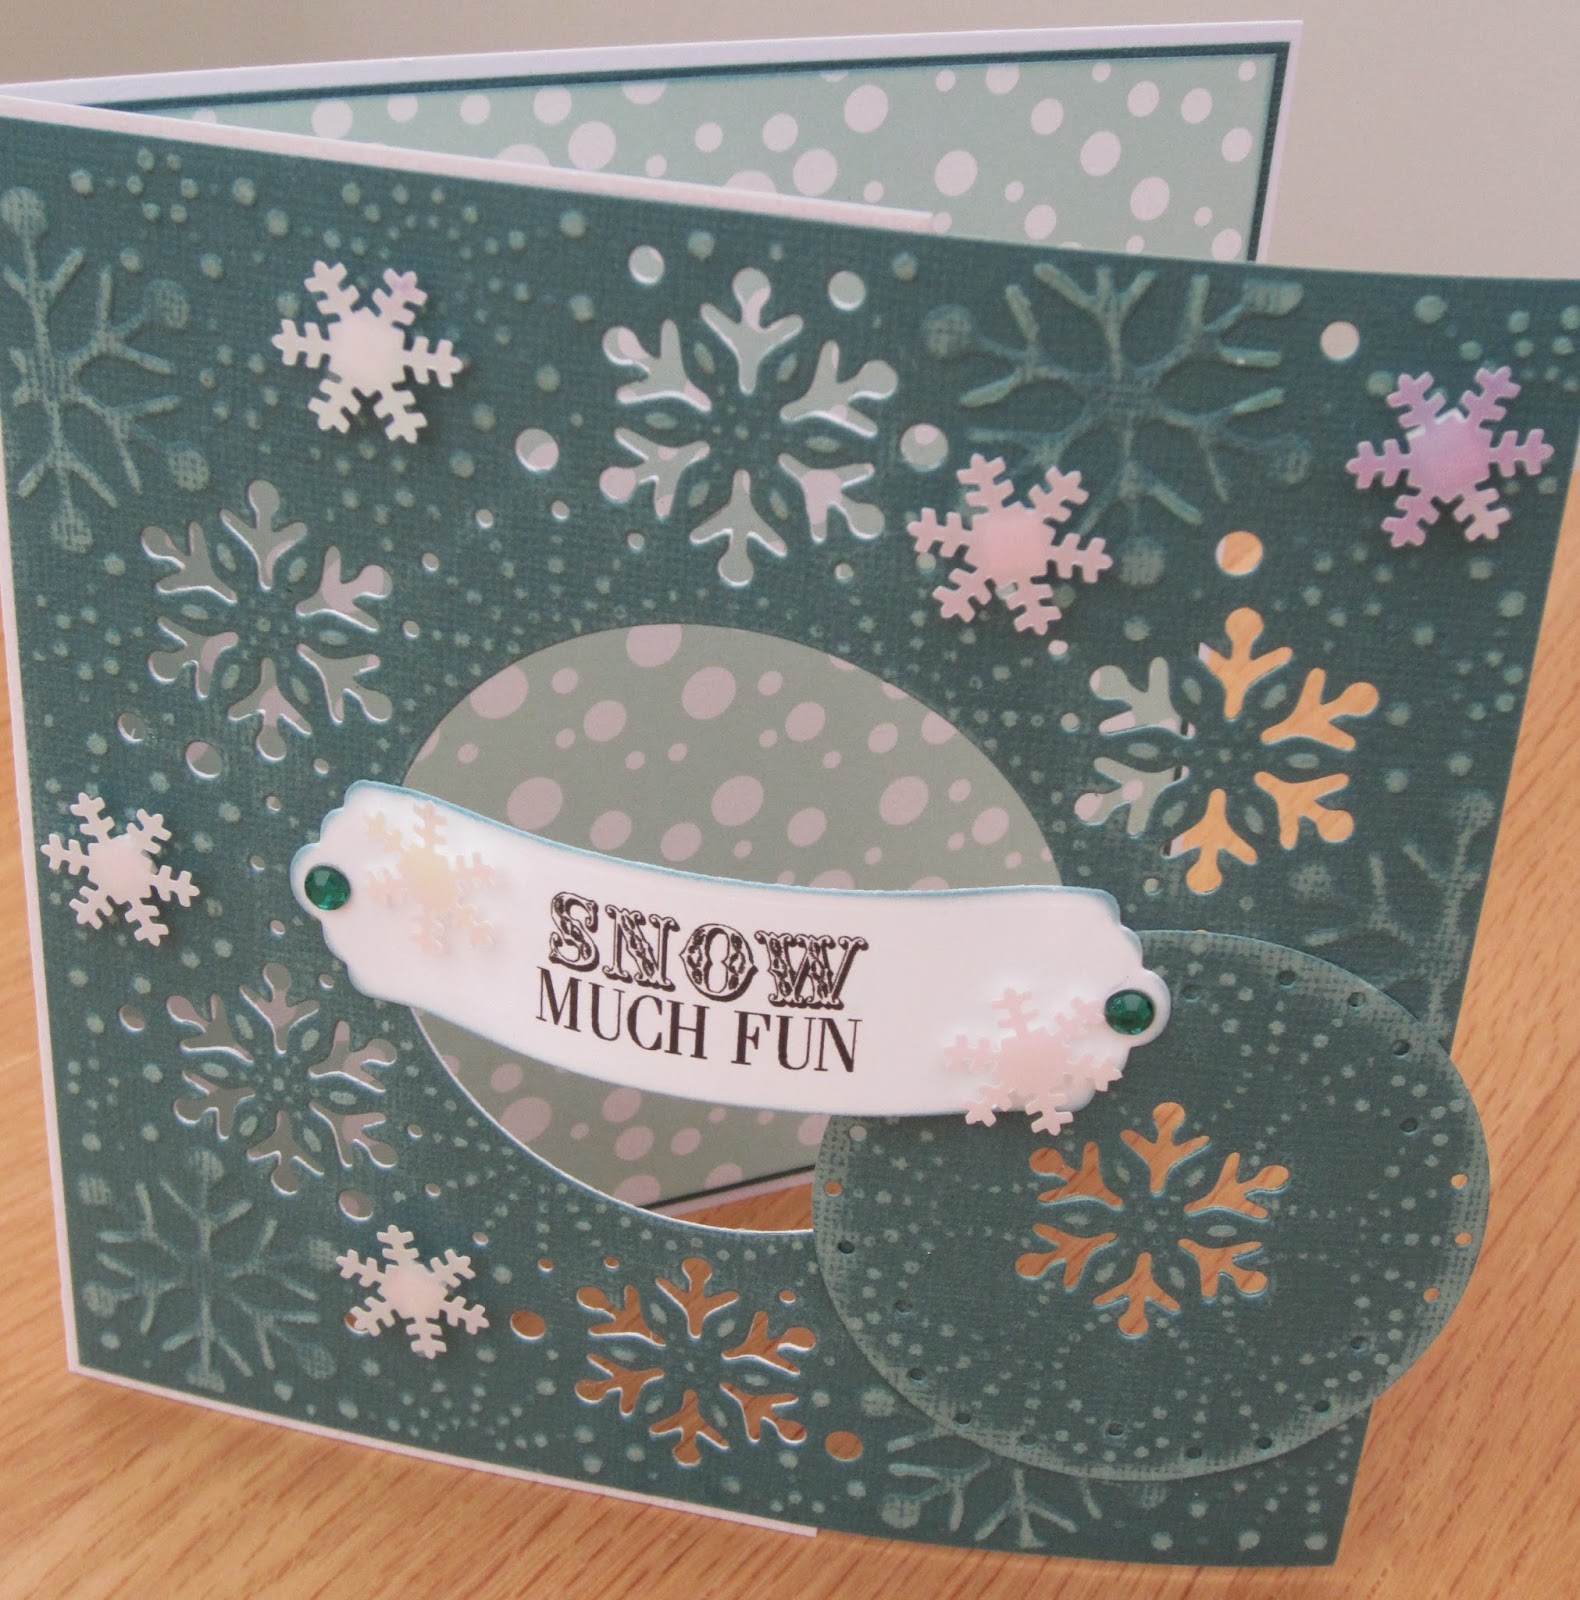
This card is a simple 8x8 card with dark pink coredinations card embossed with the softly falling A4 embossing folder from the Vintage Christmas Embossalicious range, some Christmas 6x6 backing paper and the die itself cut and embossed in Centura Pearl hint of silver with some pink memeto ink picking out the detail.

Using the same die but a completely different colourway this card is more 3D with the sentiment arched across the centre of the aperture. It is a 6x6 card blank with the front die cut as well as the cardstock so you can see through to the inside of the card. The inside is covered with co-ordinating backing paper and matted on the same colour as the front.

 This card is my favourite of all the samples I made. It uses the same die but takes it to the next level. The front is relatively simple, a 6x6 card blank matted and layered with a pale blue and a contemporary backing paper with the die cut out and attached to the front with 3D glue gel. Before removing the card from the die I dabbed the surface with embossing ink and then once the die was removed covered with silver embossing powder and heat embossed. I also added some glitter glue for extra sparkle.
On the inside I cut a strip of card 12 x 6 inches and scored at 3, 6 and 9 inches. I then lined up the die in the centre section and cut and embossed. The outside panels were then embossed with the softly falling embossing folder. I lined the inside of the card with a matching piece of backing paper, again 6x6, scoring down the middle first. I then folded the embossed and die cut piece as shown above and attached either end to the edges of the card with tacky glue.

Hope you like them, more to come in the next few days.....

Becky x

Monday, 16 June 2014

Vintage Florals Take 1!

Evening Everyone!

Bit later than planned but here are some of my Vintage Floral Samples using the gorgeous embossing folders, paper pad, CD and stamps from Crafters Companion.


Loved making these samples, the papers and embellishments on the CD do all the work for you and the embossing folders as always are to die for!!

Back soon with more
Becky x

Sunday, 8 June 2014

Vintage Florals and beyond....

Hi Everyone,

Hope you all enjoyed the launch of the vintage florals, I've got lots of cards to share over the next few days that I made for the launch. Was so exciting to see them on TV.

Since then lots of wedding planning has been going on and not so much crafting but I made a 30th Birthday card yesterday and was very pleased with the outcome so thought I'd share it as my blog post today.

I used Chocolate Baroque Mackintosh stamps which I got for my birthday and coloured the image with brilliant Spectrum Noir Pencils from Crafters Companion - seriously, if you don't have them yet you NEED them! I then embossed the main card with the rose swirl A4 embossalicious embossing folder from the vintage florals launch and added matting and layering with patterned papers and centura pearl. A bit of glitter and a few pearls finished it off.


Hope you like it, I'll be back in the week with more vintage florals samples from the launch

Bye!!

Thursday, 22 May 2014

Sneak Peek!!

Afternoon Everyone, hope you're all managing to keep out of the stormy weather, hasn't reached us here in the Midlands yet.

I've got a sneak peek of one of my samples for the latest Crafters Companion launch which is beautiful! A whole array of embossing folders in 6x6, 8x8 and A4, some beautiful stamps and paper pad and a CD Rom that works in conjunction with everything else - Amazing.


This 8x8 Easel card uses the 6x6 Vintage Decor and the 8x8 floral wonder embossing folders, as well as backing papers, ribbons, postcards, and sentiments from the fantastic CD. I also used Kraft card, Centura Pearl hint of Gold, distress inks, gilding wax and the die'sire small rose quilling die and leaf 2 die. On the CD there are now papers which match your embossing folders perfectly so you can emboss the patterned papers with the exact same pattern!! Just remember to print on ACTUAL FIT/SIZE. Very clever!

This collection is soooo lovely, I can't wait for the launch on Ideal World on Tuesday 27th May, make sure you tune in!!

Bye for now
Becky

Sunday, 18 May 2014

Makey Bakey Mice and AMAZING Spectrum Noir Pencils!!

Hi Everyone,

First of all apologies it's been a while since I last blogged, it's been a crazy few weeks! What with getting engaged (SOOOOO EXCITED!!), design team stuff, numerous birthdays and more, suddenly it's the middle of May and I need to get back to blogging.

This weeks project is a cute wedding card using the Makey Bakey mice stamp and coloured with Spectrum Noir Pencils - LOVE THEM! If you havn't got some already you really must give them a try they are fab. Check out the Crafters Companion website to get yours.

Here I have used the embossing folder which comes with the amazing Ebosser for an elegant backdrop and used purple as my accent colour. The pencils are a dream to colour with and the groups of three within the bigger sets make blending super easy.

Hope you all like it,
Becky

Sunday, 13 April 2014

Hanging Owl

Evening Everyone,

Well, it's been a busy last week of term but I had to find time to make up this gorgeous owl I bought at the NEC from Anna Marie Designs. I used My Minds Eye papers and of course had to add some flowers made using the Crafters Companion Die'sire dies, Dahlia and Small Rose.


I used the Collall Tacky Glue to adhere all my papers to the mdf shapes and to stick the mdf shapes on top of each other and they have all stuck beautifully, amazing glue!! I inked the edges of all the pieces with Tim Holtz brushed corduroy to cover the white edges of the paper.


I made the flowers using the die'sire dies and matching papers from the My Minds Eye paper pad and inked the edges once the flowers were assembled. I stuck them to the branch with Collall 3D glue gel.
A piece of brown organza ribbon knotted at the back finishes the hanging and now I just have to find somewhere to keep him!

Hope you like him
xx

Sunday, 6 April 2014

Flower Gift Box

Hi Everyone,

Here is my project for this week using Crafters Companion die'sire quilling dies.

The box started out as a simple kraft papier mache box which I coloured green with peacock feathers Tim Holtz distress ink (it's come out a bit darker on the kraft card so more green than teal)

I added a contrasting patterned paper to the lid which I embossed with Embossalicious 6x6 petite dots embossing folder and then made paper flowers using coredinations card, the dahlia die'sire quilling die and leaf 2 die.

Hope you like it!